Iguana – Structure & Style
1 Introduction
1.1 Theming your site
Most sections of the documentation are about the content of your site(s). This document however describes how you can “theme” your site.
The main components that determine the style of your site are:
· the site profile sections
· the page layout template
· the position of applications on each page
· (banner) images
· (banner) animations
· the CSS
· the templates.
The main elements that are discussed in this document are:
· theme
· template.
The other theming elements mentioned are described in other sections of the documentation.
1.2 Guidelines for using and modifying style sheets
Although Iguana's CMS includes definitions of a large number of presentational elements, it may be that you reach the limit of these capabilities at some stage, in other words, there are some changes you find you cannot make with the CMS alone.
The cascading style sheets supplied with Iguana can be used to further modify the presentation of the Iguana pages.
Although Infor has provided some examples of modifications of style sheets in the documentation below, this is not intended to be a complete tutorial, and Infor assumes that the customer who wishes to modify CSS files has the expertise, or sources that expertise for themselves.
This is a brief statement of Infor practice and the standards of practice expected on the customers' systems.
Note
Infor may overwrite the default style sheet files on the occasion of an upgrade, or, indeed, at any time, for support purposes.
Therefore, do not edit a supplied style sheet file – create a new one of your own.
The files you should not edit are ALL THE FILES under the css/themes directory (see screenshot below for illustration).
Iguana is built on the concept of themes, and normally we expect the customer to follow a theme for a set of web pages.
However, it is possible to simply create a CSS file and apply it to one page or a number of pages individually.
Infor's preference is for the creation of a new theme.
1.2.1 How to create a new theme
It is assumed that the customer has access to the file system on the server where the files reside – this may be a separate web server or it may be that everything resides on a single server.
1. Navigate to the Iguana directory and then to the subdirectory CSS/css/themes, for example
M:\newinfor\iguana\CSS\css\themes

2. Each directory under "themes" represents a theme with that name. Create a new directory at this level with the name of your new theme, e.g. "custom".
3. Create a file in this directory with the name of your new theme, e.g. "custom.css".
4. Set the first lines in the file to include the base css file of the theme from which you are deriving your new theme, for example, if you were basing your theme on the base theme, you would open the file with
@import url("../base/base.css");
Or, if you were basing your theme on the highcontrast theme, you would open the file with
@import url("../highcontrast/highcontrast.css");
Of course you could copy a complete base css file from another theme, but this approach gives the best compatibility with changes to the Infor supplied base style sheets.
5. Make your changes in this file, and add comments to indicate the purpose of the change.
6. In testing, simply add the parameter Theme=YourThemeName to the Iguana URL. (This persists for the session unless you revert to the default theme explicitly.) For example
//server/Iguana/StartCMS.cls?Theme=custom
7. Set the site to use the theme by configuring this in the advanced properties of the site profile in the CMS.
If you do not create a theme
Infor advises you to locate your CSS files in the same structure, i.e. the themes subdirectory, and name them appropriately.
This is of course not the only way to handle style sheets. It may be that a different way to proceed suits your specific circumstances better. Whatever choice you make, be sure to be consistent with the principles in this document, and record your changes for the person who comes after you.
Note
You can also use the Media Manager under General & Tools to upload a theme.
2 Themes : using CSS to style your site
2.1 Introduction
Styling an Iguana site is primarily done through the usage of CSS (Cascading Style Sheets). Iguana is delivered with a number of standard CSS themes, which you can use to style your site. Iguana's default installation will use two style sheets: a local and a base style sheet. The base style sheet (called /base/base.css), is the basic style sheet that holds the standard settings for an Iguana site. The local style sheet holds the local settings: those that are different from the ones in the default style sheet. The local style sheet can inherit its properties from the base style sheet, so that it only needs to contain those settings that are not generic.
If you maintain multiple site profiles, each of them can have its own theme, or they can all share a common theme. The local style sheets are stored in /css/themes/ (e.g. /css/themes/orange/orange.css or /css/themes/kids/kids.css).
It is also possible to apply multiple themes to the same site profile. The site is started up with the default theme (for that site profile). If you change the theme at a later stage (e.g. by a choice in the site or by submitting it as part of the URL), it is stored “for the session” (i.e. it will last as long as the session lasts, or until you explicitly change it to a different theme).
The default style sheet can and will be replaced with upgrades to new versions of Iguana, so you should never change it, as you will loose your changes during the upgrade to the new version. Therefore changes should only be made to the local style sheet(s), the one(s) that hold(s) all your local settings.
Although CSS is very powerful, it also has its limitations. For changes that cannot be achieved through CSS, Iguana uses so-called templates, which “cooperate” with CSS to style and structure specific areas of the site. Templates are discussed later in this document.
This documentation will not discuss CSS itself. If you want to learn about CSS, you can find information and online tutorials on the Internet (e.g. http://www.w3schools.com/css/) or in multiple books on the subject.
Note
All specific themes are applied on top of the base theme.
2.1.1 Overview of Iguana “standard” themes
Iguana is delivered with the following standard themes.
|
orange |
|
highcontrast |
|
flandersRed |
|
flandersBlue |
Orange
The “orange” theme is Iguana's default theme. The main characteristics of the theme are:
· primary colours are orange, grey and black
· background is white on a grey canvas.

High contrast
This theme is specifically useful for usage by visually impaired people, as it primarily uses highly contrasting colours, i.e. yellow and white on a black background. The main characteristics of the theme are:
· primary colours are white and yellow
· background is black.

Flanders red
The “flandersred” theme is based on a set of guidelines for Flemish public libraries. The main characteristics of the theme are:
· primary colours are red and black
· background is white
· usage of “de Bib” logo (red variant).

Flanders blue
The “flandersblue” theme is based on a set of guidelines for Flemish public libraries. The main characteristics of the theme are:
· primary colours are blue and black
· background is white
· usage of “de Bib” logo (blue variant).
This is a blue variant of the “flandersred” theme.
2.1.2 Which CSS files are used and where to find them
The CSS files that are used are located on the web server in a folder that has the same name as the name of the style sheet.
The base CSS file is called /base/base.css.
A local CSS file has a varying name, which can be any valid CSS file name (e.g. /kids/kids.css or /orange/orange.css).
2.1.3 Change the theme by submitting it in a URL
You can change the theme by submitting it as part of the URL. You can add the URL parameter ?theme=themeName to change the theme, e.g. http://www.site.com/iguana/www.main.cls?theme=kids. This would invoke the kids theme.
If you submit a theme that does not exist, the page will be shown without CSS applied.
You can return to the default theme by submitting it as ?theme=default, e.g. http://www.site.com/iguana/www.main.cls?theme=default.
2.1.4 CSS and browsers
Although CSS is a W3C standard, it is important to realize that differences between browsers can exist. Not every browser interprets CSS the same way, and different solutions may be necessary for individual browsers (or even browser versions).
In upcoming sections of this chapter you will find information on how to change your local CSS file(s). You should always test your changes for (recent versions of) the popular browsers (Internet Explorer, Firefox, Chrome and Safari).
2.2 Styling your site with CSS
CSS can be used to change obvious styling elements such as colours, fonts, background and alignment. It is however not limited to such relatively simple settings.
2.2.1 CSS example
Although it is not our intention to explain CSS, we do include a simple example of how CSS works, as an introduction to the follow-on sections on how you can change the style of your website(s).
The basic principle behind the usage of CSS is the strict division of content and mark-up on the one side and styling and formatting on the other side. The basic principle is that you attach a class to an HTML element and that you define the formatting of the class in CSS.
A simple example will illustrate this. If you have on a page the text
Elysium
and you want to change this to
Elysium
you can achieve this as follows. In the HTML code the element “Elysium” is surrounded by a <DIV>, e.g.
<DIV>Elysium</DIV>
This <DIV> is attributed a class, e.g.
<DIV CLASS=”Test”>Elysium</DIV>
You can now use CSS to define the properties of the class “Test”, e.g.
.Test { font-weight: bold; }
[The leading dot indicates that “Test” is a class.)
This setting is defined in a CSS file which is stored on the web server.
If you want to format the same text to italics and red:
Elysium
you change the class properties to e.g.
.Test { font-weight: bold; font-style: italic; color: red; }
2.2.1 Changing the style in a few easy steps
The example in the previous section is a simple one, but already introduces some of the challenges of working with CSS: how do you know which classes you have to change to achieve a specific effect or style element? A CSS file can contain hundreds of elements with thousands of properties.
In a number of cases it is relatively easy to know which classes are used because you can define custom classes for some of Iguana's key components. This is the case for e.g. applications that are added to a page: they can be attributed a custom class when they are added to the page.
However, in most cases, the classes will be system-attributed and you will not know which class names were used. To find which class is used for a specific element, you can use tools such as FireBug, an add-on for the Firefox browser. “Firebug is a web development tool that allows the debugging, editing, and monitoring of any website's CSS, HTML, DOM, and JavaScript, and provides other Web development tools.” (from http://en.wikipedia.org/wiki/Firebug_(web_development) ).
To find which class is attached to a specific element on the page, proceed as follows.
1. Open the website in Firefox and enable FireBug.
2. Click on the button in FireBug's top button bar (![]() ).
).
3. Once you have done this, you can now “inspect” any element on the site that you are looking at. FireBug will display both the HTML and the related CSS settings. This will allow you to detect what the class name of the element is.
4. Once you know the class name, you can change its style properties in the CSS file. You can do this with the editor of your choice (e.g. Notepad++). You will need to know the name of the theme that you are using to access the correct CSS file. [You should never select /base/base.css.]
5. Once you have saved the CSS file, the new settings will be available. To see them reflected in your site, you will in most cases need to empty your browser cache and at least need to reload the page you are looking at.
The following screen shot shows the “inspect element” feature of FireBug at work. When the mouse moves over an element on the page, it will be surrounded by a border. In the screen shot this is the case for the logo at the top left of the page. At the same time the element is shown in FireBug's “inspect mode”. This will reveal the element's class, which in this case is the class “logo”, which is attached to the <DIV> that surrounds the image (the <IMG> tag). At the right of the FireBug page you can see the properties that are attached to this class in the CSS file.

Please note
|
|
FireBug is not the only tool that can be used to inspect elements on a page. Chrome e.g. has a similar feature, which can be accessed via > . An additional pane will be opened that has an option in its bottom option bar ( In Internet Explorer the feature can be accessed via > , where it ( Please note that a class can be used on more than one location (e.g. .title). If you only want to change the title at one location you will need to make the call more specific. This can be done by adding class/ID/.. of parent elements. Example: if you only want to change the .title when the customer chooses a large font you could use this:
|
2.2.2 Changing the style: examples
As expressed before, we will not explain the applied CSS in much detail. Information on CSS and its possibilities can be found on the internet and in many books and its possibilities are too extended to explain in the scope of this documentation. We will however include some sample CSS changes in this section to give you an idea of how to achieve visual effects via CSS.
|
|
We advise you not to change the CSS of your site if you do not have a good knowledge of CSS and at least some experience with CSS implementations. |
The starting point is the following page:

CSS Sample 1 – Different background colour
We change the background to two shades of blue.
This is achieved in CSS as follows:
#header, .HeaderLogo, #banner, #wrapper,#wrapperinner, #content,#footer, #footerinner {
background : #def !important;}body {
background: #abc !important;}
[ #def and #abc are the colours. We will not explain the function of !important as it is not relevant to understand the change of colours in this example. You can find information on the function of !important on the internet. ]

CSS Sample 2 – Change font-family
We change the font-family to Courier.
This is achieved in CSS as follows:
body, div, h1, h2, h3, h4, h5, h6, form, textarea, p, td, input {
font-family: courier;}
[ In other words: set the “font-family” to Courier for all the mentioned HTML tags (body, div, h1, etc.). ]
|
|
Please note that changing the font-size is much more complex, as the Iguana default CSS uses frequently the CSS “inheritance” principle. This makes it harder to change the values. |

CSS Sample 3 – Increase distance between widget border and widget content
We increase the margins between widget border and widget content. To make this visually more explicit, we also add borders and a different background-colour to the widgets.
This is achieved in CSS as follows:
.applicationcontainer {
background-color: #fff;
border: 1px solid #999;
margin: 20px;
padding: 20px;}

CSS Sample 4 – A different colour for widget titles
We change the widget title's colour from orange to blue.
This is achieved in CSS as follows:
.apptitle h1, .apptitle h2 {
color: #06c;}
[ Look at the widget titles in the following screen shot: they are now blue. ]

CSS Sample 5 – Different colours in the main navigation menu
We change the colours in the main navigation menu.
This is achieved in CSS as follows:
#navigation {
background: #cef !important;
border: 1px solid #003;}ul.StaticNavigationNSAlt li.root {
background: transparent !important;}ul.StaticNavigationNSAlt li.root {
background: transparent !important;}ul.StaticNavigationNSAlt li.root:hover {
background: #8df !important;}ul.StaticNavigationNSAlt li.root:hover > a {
background: transparent !important;}
CSS Sample 6 – Browser specific settings
If you want to make certain settings applicable for a specific browser, you do not need to define multiple style sheets for each browser. This can be done within a single style sheet.
At the highest level (the ‘html' tag) Dojo adds an extra class, which can be used to define CSS rules for specific browsers. In IE this says ‘dj_ie', in Firefox ‘dj_gecko' etc.
Note that this class can not be viewed by looking at the page source, it is inserted by Dojo. To view it, Firebug can be used in Firefox, Developer Tools in IE (F12) etc.
The class need not be named after the browser, the essence is the rendering engine (e.g. Chrome has ‘dj_khtml dj_gecko').
An example
There is a CSS line:
div.items .item {
background-color: black;
}
But this must be red in IE only. For this add the following line:
.dj_ie div.items .item {
background-color: red;
}
3 Templates
3.1 Introduction
The concept of “templates” is the major principle that gives structure to ‘display elements' in Iguana. Templates are used for all sorts of purposes, e.g. to structure full pages, to structure specific applications on a page, to structure parts of applications, and so forth. While some templates have an effect on a whole page, others are related to very specific areas.
In most cases, templates cooperate with CSS settings to create the actual presentation. The template is the main principle for structuring the data (content), while the CSS settings are the main principle for styling. These two principles interact frequently and cannot be seen apart from each other.
Templates are used for those changes to the site that cannot be styled with pure CSS. Furthermore, the usage of a template also enables the introduction of additional classes. Changing templates gives you full control over your site. It is a very powerful, but also risky technique, as even small changes can break a correct display.
Templates are expressed in HTML and therefore technical by nature. They can contain so-called ‘substitution strings' that are replaced, when the template is applied, by run-time variables or by strings generated by run-time code. [See below for more information on the usage of substitution strings.] Some templates also require knowledge of dojo templates. Dojo is the JavaScript framework used by Iguana (see also http://dojotoolkit.org/).
By consequence, templates can be very complex and hard to read. Therefore we suggest that you only modify existing templates if absolutely required.
However, to accommodate the (rare) need for modifications to system-delivered templates, Iguana allows you to create Local content templates (as opposed to their standard counterpart). When accessing a template, Iguana will always first check for the presence of a local variant; if available, the local variant will be used. If not, Iguana will revert to the standard version of the template.
Please note
|
|
We mentioned the usage of ‘substitution strings'. Please note that these substitution strings are generally dependent on the template and the functionality the template belongs to. So using a ‘substitution string' which is present in template A for functionality X will generally not have the same (or correct) effect when used in template B for functionality Y. Examples of substitution strings can be found in the chapter on JavaScript & CSS files in the document on Pages & Profiles. |
3.1.1 Templates : functions and examples
Templates are used for many purposes. The main areas where templates are used are:
· the full record and search page (layout of display elements)
· the personal profiles page (layout of display elements)
· application containers (and its three variants: containers with a title bar, containers without a title bar, and containers that have a title bar that appears if an onMouseOver event occurs, i.e. when the user moves his mouse over the top of the container)
· navigation elements (e.g. the layout of individual items in a rollover navigation menu)
· newsletters (a module that becomes available as an add-on module after version 2).
3.1.2 Page templates and site profile sections
Even more fundamental than the templates described in this section are page templates and site profile sections. These are not maintained via the Templates option, but via the Pages and Site Profiles options respectively.
Site profiles sections define presence and location of the main sections of a site (e.g. header, footer, banner, navigation and content section). See the chapter Profile sections: how to define the layout of a site in the document on Pages & Profiles.
Page templates define the location of the application (widgets) in the content section of a specific page. See the chapter How to define the layout of a page: templates in the document on Pages & Profiles.
3.2 Templates overview
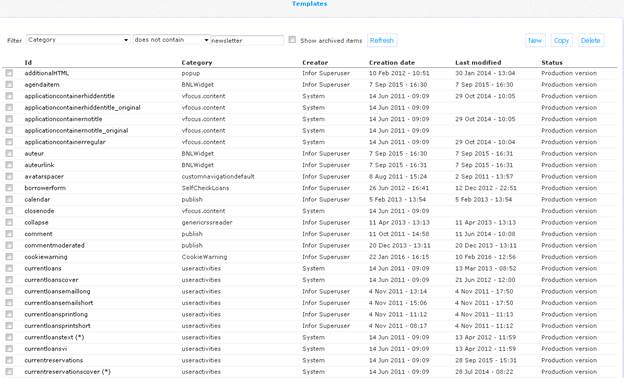
Select the option ‘Templates' from the left navigation pane on the Iguana CMS home page
the list of existing templates is displayed:
This display uses a generic element in the Iguana CMS, - the overview page of instances of a specific data type.
The Templates overview page is described in the chapter Instances overview page of the "Management common workflow" document.
The options on the Templates overview page are described in the chapter Options on the instances overview page of the "Management common workflow" document.
Note
Templates with a local variant have a (*) suffix in the list.
3.3 How to create a template
To create a new template, act as follows.
1. In the left pane, click on the Templates link, which can be found under the “Structure & Style” header.
2. On the overview screen of existing templates, click on the button.
3. A new page is opened, allowing you to define all properties of the new template. Define all settings for the new template.
4. Click on the button to save your work.
Because Iguana only ‘knows' of a specified set of templates, creating a new template will not have any effect, unless accompanying developments that use the new template are carried out.
3.4 Template property overview & options
The properties of templates are ordered in a number of so-called property groups, which are sections on the page. The property groups are:
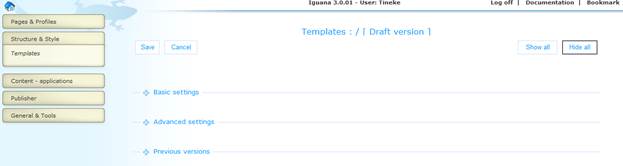
Each of these property groups forms a separate section on the Profile details page. Each section can be collapsed or expanded by clicking on its title. The and buttons can be used to expand or collapse all sections.
3.4.1 Basic settings
The basic settings of profiles are:

Define the basic settings as follows:
Id: This is the identifier of the template. Typically, the identifiers are technical and expressed in English. No attempts are made to express these identifiers in a non-technical wording, as these serve a technical purpose only. The Id of a template cannot be changed because it is called by code that uses this specific Id and Category (see next property).
Category: Each template is placed into a category. The combination of the Category and the Id make a template unique. The category of a template cannot be changed because it is called by code that uses this specific Id and Category.
Contents: The standard version of the template content, expressed in HTML.
Local contents: The local version of the template content, expressed in HTML.
3.4.2 Advanced settings
The advanced settings of templates are:

Created by: This is the person who created the Site profile and the date on which it was created. You cannot modify these properties.
Modified by: This is the person who last edited the Template and the date on which it was modified. You cannot modify these properties. Only visible when updating an existing definition, not present on the form for defining a new template.
Unique id: This is the unique id of the Template. You cannot modify it.
3.4.3 Previous versions
Iguana will store up to ten previous versions, which are displayed in the Previous versions property section. The previous versions can be invoked by clicking on them.
If a Previous version is selected, it can be saved as the current version by clicking on the button.
3.5 An example template
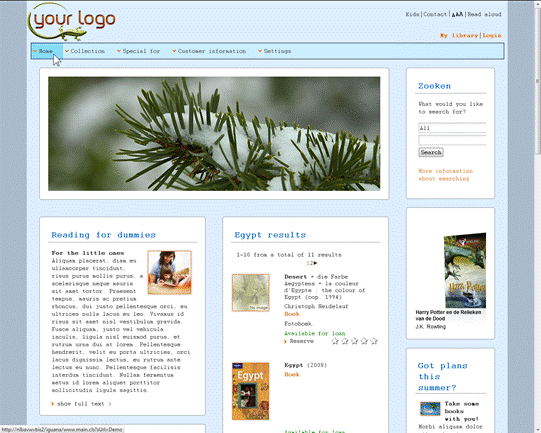
We will illustrate the function of a template with an example. The following screen shot displays a full record page for the record “Harry Potter and the Deathly Hallows”. This page uses multiple templates. The one that we will briefly explain in this section is the template that is used for the widget that displays Related works, - the one at the right of the page with the title “Misschien ook interessant voor u…” (“Maybe interesting for you…”).

The template that is used for this widget is called “relatedworks” of the category “search”.
This template looks as follows:
<div class='recordDisplayElement smallimage notools' onclick='Search.Results.select("${GroupId}","${RecordId}","RelatedWorks");return false;' style='cursor:pointer;'>
<div class='top'></div>
<div class='image'>${Image}</div>
<div class='data'>
<div class='group'>
<div class='title'>
<span class='title briefMainTitle'>${BriefMainTitle}</span><span class='briefTitle'>${BriefTitle}</span>
</div>
</div>
<div class='group'>
<div class='BriefAuthor'>${BriefAuthor}</div>
<div class='briefMaterial'>${BriefMaterial}</div>
</div>
<div class='group'>
<div class='briefExtract'>${BriefExtract}</div>
</div>
</div>
<div class='bottom'></div></div>
Without going into all details, the template consists of a <div> structure, in which the <div>'s that relate to the actual content (the data that is displayed) each consist of a class and a reference to a data element. The author part of the <div> structure is e.g.
<div class='BriefAuthor'>${BriefAuthor}</div>
This basically means: display the author (expressed via the syntax $(BriefAuthor)) and apply the class BriefAuthor (class='BriefAuthor') to it.
The above example is the system-provided version of the template. You can create a local version of this template and e.g. apply a different class (a different style), or remove this <div> from the structure, which would result in a display that does no longer include the author.
|
|
We advise you not to change templates light-heartedly. It may be obvious from this relatively simple example that changing templates requires good knowledge of HTML, and in some cases of CSS. Furthermore, you cannot change the token structures: if you change e.g. $(BriefAuthor) to $(BrieffAuthor) [note the double ff], then this would result in errors, as the code that uses the template does not “know” that token. |
3.6 Defining start & end HTML of bodysection
This is about the initial page HTML that is generated by Iguana. The initial page HTML is divided into several sections based on the used site profile (these can be set/re-ordered in the CMS for each site profile under ‘Pages & Profiles' -> ‘Site profiles' -> ‘Profile sections'). These sections each control a ‘div' element with an ‘id' attribute signifying what they are, and the content is placed inside them, with (depending on the type of section) some HTML surrounding the content. The general HTML structure is as follows:
<div id="header">
Pre-content
Content
Post-content
</div>
Where ‘Pre-content' and ‘Post-content' are pre-defined and depend on the specific section. The values of ‘Pre-content' and ‘Post-content' are normally hard-coded. But it is possible to override these per type of section, by creating a template (the absence of a specific template here means it will use the hard-coded value), with the value for ‘id' relating to the specific section (‘header', ‘banner', ‘navigation', ‘content' and ‘footer') and ‘bodysection' as its category. In this template, the value should be of the form:
Pre-content-value
Or
Pre-content-value^Post-content-value
Where Pre-content-value and Post-content-value can be empty.
Pre-content-value will be used for Pre-content in the general HTML structure above, even if empty. If ‘^Post-content-value' is supplied (even if Post-content-value is empty), this will be used for Post-content in the general HTML structure above, otherwise the default value will be used.
For instance, we can have a template for the header section, id ‘header' and category ‘bodysection', with value:
<a name="anchorHeader"></a>^<div style="clear:both; display:block;height:0;"></div>
This means that in the generated HTML, the header section looks as follows:
<div id="header">
<a name="anchorHeader"></a>
Content
<div style="clear:both; display:block;height:0;"></div>
</div>
3.7 QR code
It is possible to integrate “Quick Response” codes in the full record display in Iguana.
It will look similar to:
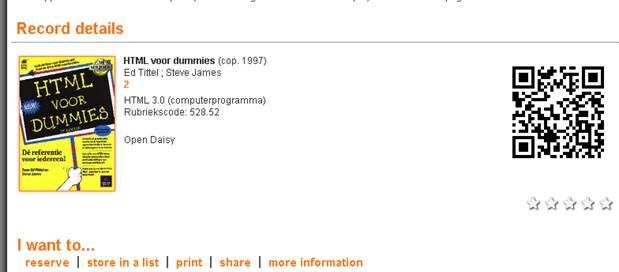
The QR code can be included in the record display by adding the ${QRcode} placeholder to the recorddisplay template.

If IE9 or Chrome is used to get to the full record display, the URL for the QR code is generated as
https://chart.googleapis.com/chart?chs=150&cht=qr&chl=http%3A//nbibdev.vub.ac.be/opac/2/1870
If Firefox is used, the code is correctly generated as:
[alt="QR", src="https://chart.googleapis.com/chart?chs=150&cht=qr&chl=http%3A//nlbawqavubis/iguana30qa/www.main.cls%3FsUrl%3Dsearch%26p%3D*%23RecordId%3D2.1870"]
· Document control - Change History
|
Version |
Date |
Change description |
Author |
||||
|
1.0 |
August 2011 |
Creation |
|
||||
|
1.1 |
December 2011 |
Added screen shots for default themes |
|
||||
|
1.2 |
December 2011 |
Processed comments from EdwinVDG |
|
||||
|
1.3 |
December 2011 |
Added examples of CSS changes |
Edwin van der Geld |
||||
|
1.4 |
December 2011 |
Added more information on sample CSS changes |
|
||||
|
1.5 |
January 2012 |
Added header |
|
||||
|
1.6 |
January 2012 |
Added Template example Reviewed |
|
||||
|
2.0 |
May 2012 |
Reformat for online help doc |
|
||||
|
3.0 |
October 2012 |
Added screen shots,guidelines, more explanations; reformatted |
|
||||
|
3.1 |
April 2014 |
QR code for full record display |
|
||||
|
3.2 |
August 2014 |
Textual improvements |
|
||||
|
4.0 |
April 2016 |
Local variations of template with * |
|
||||